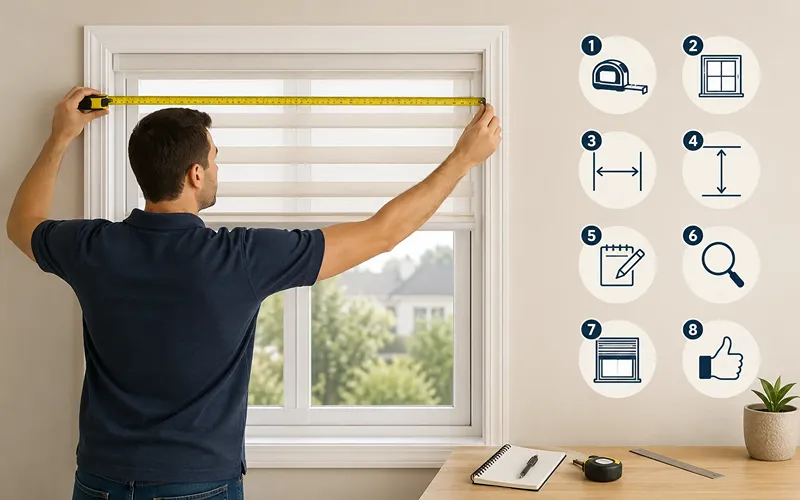
Accurate measurements are the foundation of good blinds installation. A small error in width or height can lead to gaps, poor light control, or a blind that does not fit the frame at all. This guide by Roller Blinds Dubai breaks the process down into eight simple steps, covering the tools you need, how to measure width, height, and depth, and the small details that make the biggest difference in the final fit.
Step 1: Gather the Right Tools
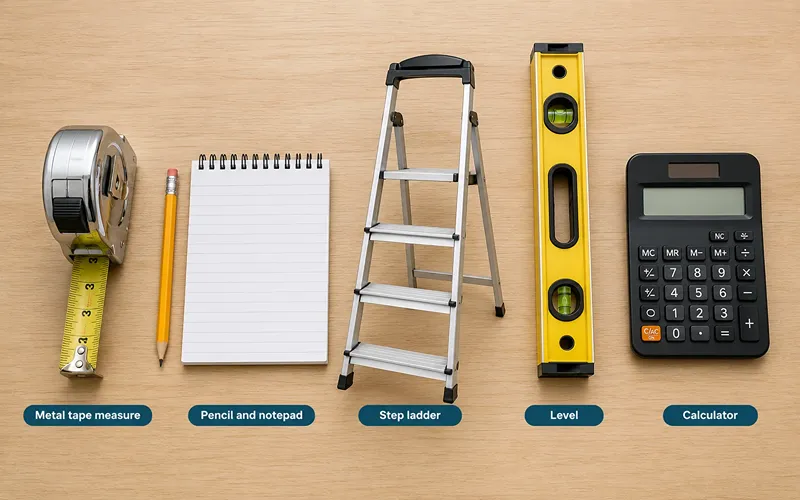
Before you begin, collect everything you will need so the process goes smoothly from start to finish:
- Metal tape measure: More reliable than fabric or plastic tapes, which can stretch and affect accuracy.
- Pencil and notepad: Record each measurement right away instead of relying on memory.
- Step ladder: Needed for taller windows or hard-to-reach frames.
- Level: Confirms whether the window frame is square, since many frames are slightly uneven.
- Calculator: Useful for rounding numbers or working out overlap allowances.
Having these tools ready in advance helps you avoid interruptions and reduces the chance of measuring errors.
Step 2: Choose Inside Mount or Outside Mount
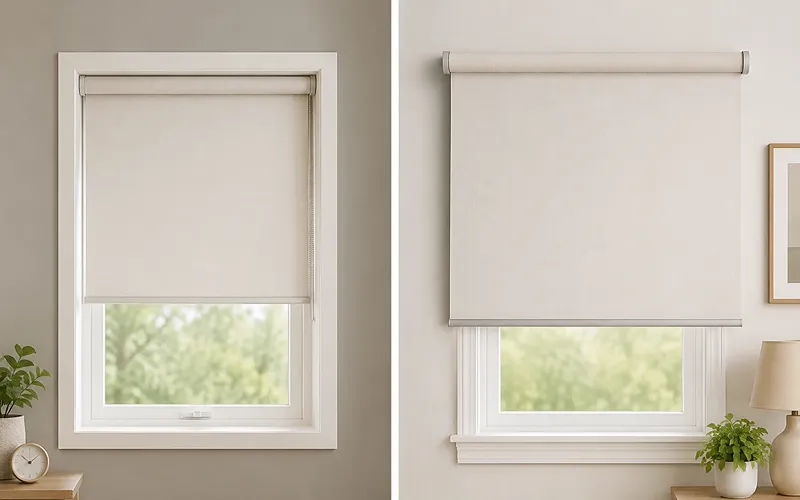
Decide how the blackout blinds should sit before taking any measurements, as this determines the method you will use.
Inside mount blinds fit within the window frame, giving a clean, built-in appearance. This works best when the frame is deep enough to hold the headrail without interference from a handle, sill, or trim.
Outside mount blinds are installed on the wall or trim around the window, covering the opening rather than fitting inside it. This option suits shallow frames, windows with obstructions, or cases where a larger appearance is preferred.
As a general guide, choose outside mount if the frame depth is less than about two inches, or if a crank handle, lock, or uneven sill is present.
| Feature | Inside mount | Outside mount |
| Appearance | Built-in, flush with the frame | Larger coverage, sits on the wall |
| Light blocking | Moderate | Better |
| Requires frame depth | Yes | No |
| Installation surface | Inside the window frame | Wall or trim around the window |
Step 3: Measure the Width
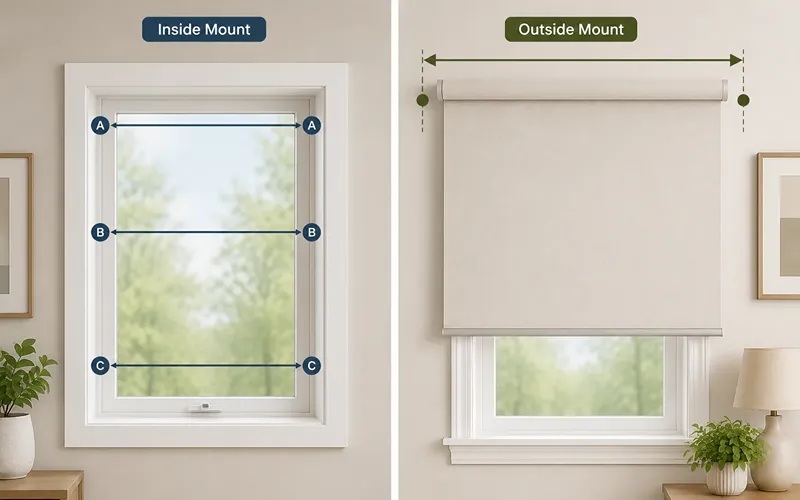
Width is measured horizontally. Taking only one reading is a common mistake, since window frames are rarely perfectly even.
- For inside mount, measure the width at the top, middle, and bottom of the frame, and use the smallest of the three figures.
- For outside mount, measure the total width you want the blind to cover, including any overlap beyond the frame (typically 1.5 to 3 inches on each side).
Recording all three width measurements ensures the blind will fit even where the frame is slightly narrower.
Step 4: Measure the Height
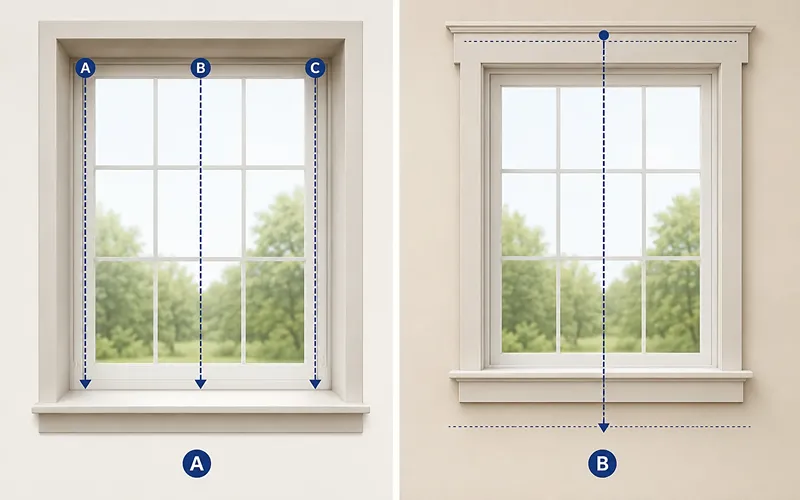
Height, also called the drop, is measured vertically from the top of the window to the point where the motorized blinds should end.
- For inside mount, measure from the top-left corner down to the sill, then repeat at the center and the right side. Use the longest of the three figures so the blind fully covers the window.
- For outside mount, measure from the planned headrail position down to where the blind should stop, whether at the sill or further below it.
Always record width first, then height, in that order (for example, “34 1/8 W x 52 1/2 H”), as this is the standard format used by manufacturers.
Step 5: Check the Window Depth
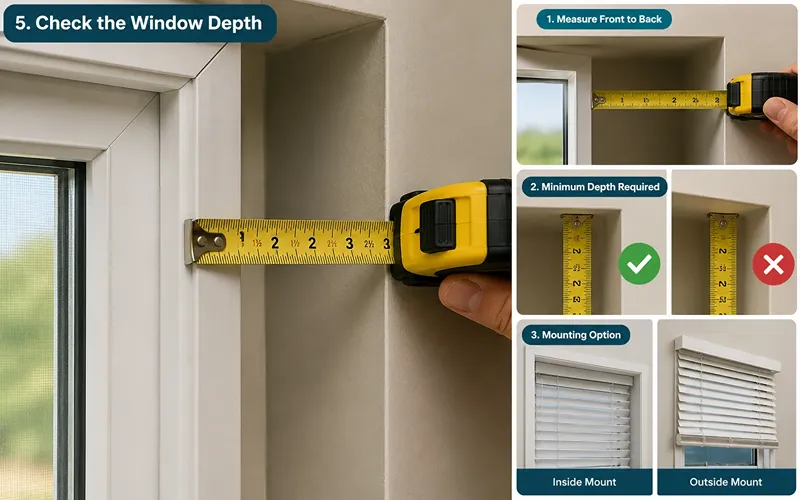
Depth determines whether an inside mount is possible and which type of bracket or headrail is suitable.
Measure from the front of the frame to the back, reading to the nearest 1/8 inch. Most blinds require a minimum depth of 1.5 to 2.5 inches, though this varies by product, so it is worth confirming the manufacturer’s requirement.
If the frame is too shallow for an inside mount, an outside mount is the appropriate alternative.
Step 6: Check for Obstructions
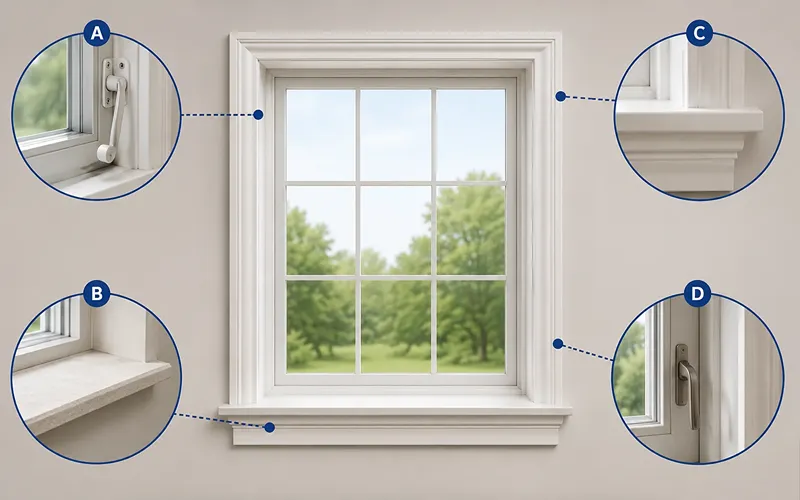
Before finalizing your measurements, check for anything that could interfere with the blind once installed:
- Cranks or locks that extend into the frame
- Uneven or angled sills
- Trim or molding inside the recess
- Handles on casement or sliding windows
Identifying these obstructions early helps avoid returns or installation issues later.
Step 7: Round Your Measurements Correctly
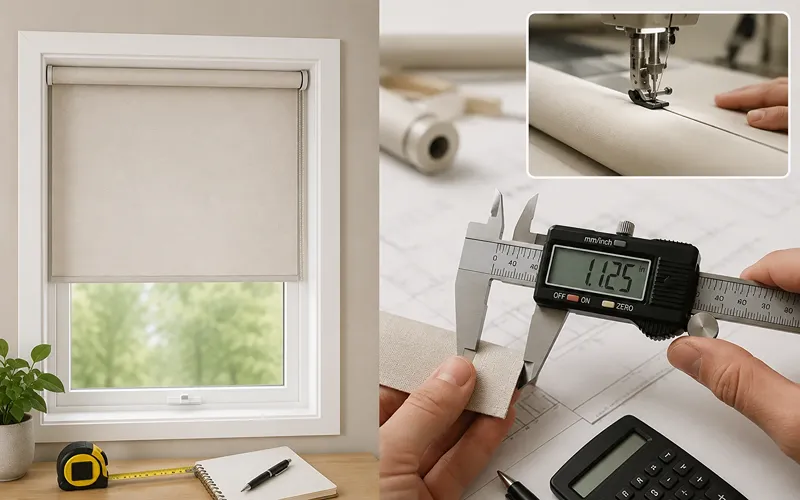
Most manufacturers ask for measurements rounded to the nearest 1/8 inch. It is important not to subtract anything yourself for clearance, as manufacturers typically account for this with a small deduction, usually 1/4 to 1/2 inch, during production.
Submit the exact measurements you recorded, and let the manufacturer apply any adjustment unless instructed otherwise.
Step 8: Review Your Measurements Before Ordering
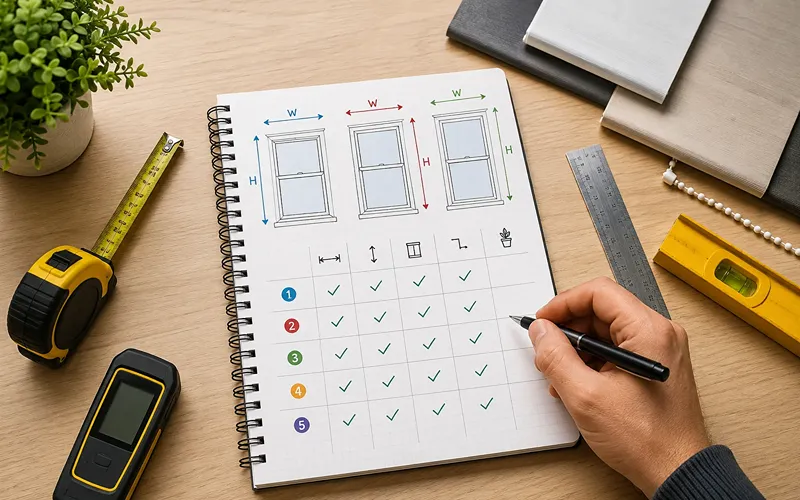
Before placing an order, review your notes to confirm the following:
- Width and height are recorded and labeled clearly for each window
- The correct mount type is noted for each measurement
- Depth has been checked where relevant
- Any obstructions have been accounted for
A brief review at this stage can prevent delays caused by an incorrect or overlooked measurement.
Common Mistakes to Avoid
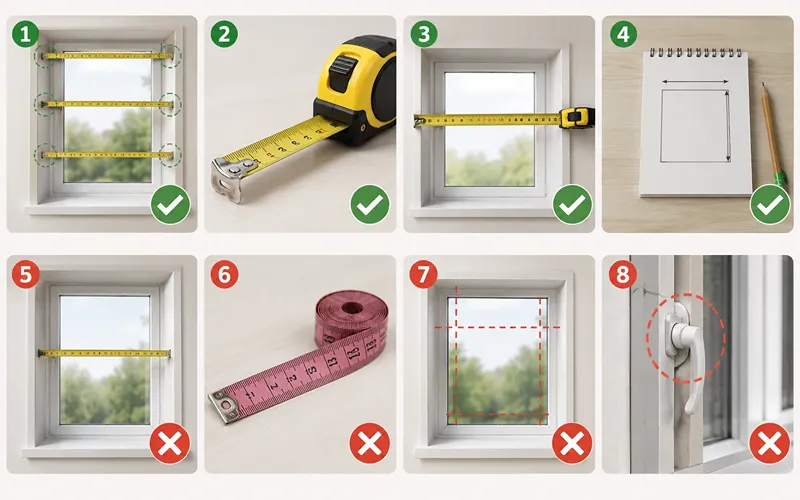
Most measuring problems come down to a handful of avoidable habits. Keep an eye out for these:
- Measuring only once. A single reading can miss slight variations in the frame. Always take three measurements for both width and height, as covered in Steps 3 and 4.
- Using a cloth or plastic tape measure. These can stretch over time, giving a slightly inaccurate reading. A metal tape measure holds its length and stays reliable.
- Guessing instead of measuring. Estimating “about 30 inches” instead of measuring precisely is one of the most common causes of a poor fit. Blinds are made to exact sizes, so the input needs to be exact too.
- Mixing up width and height. Writing the numbers in the wrong order, or transposing them by mistake, is an easy way to order the wrong size. Stick to the width-then-height format every time.
- Measuring only the glass. The glass pane is almost always smaller than the full window opening. Measure the frame or recess, not just the visible glass, or the blind will end up undersized.
- Forgetting handles, locks, and trim. These small obstructions are easy to overlook until the blind is installed and does not close properly. Check for them before finalizing your measurements, as outlined in Step 6.
- Making your own deductions. Subtracting extra clearance yourself, on top of what the manufacturer already builds in, usually results in a blind that is too small. Submit your exact measurements and let the manufacturer handle any adjustment.
Avoiding these mistakes is often the real difference between a blind that fits perfectly and one that needs to be reordered.
Do Different Blinds Require Different Measurements?
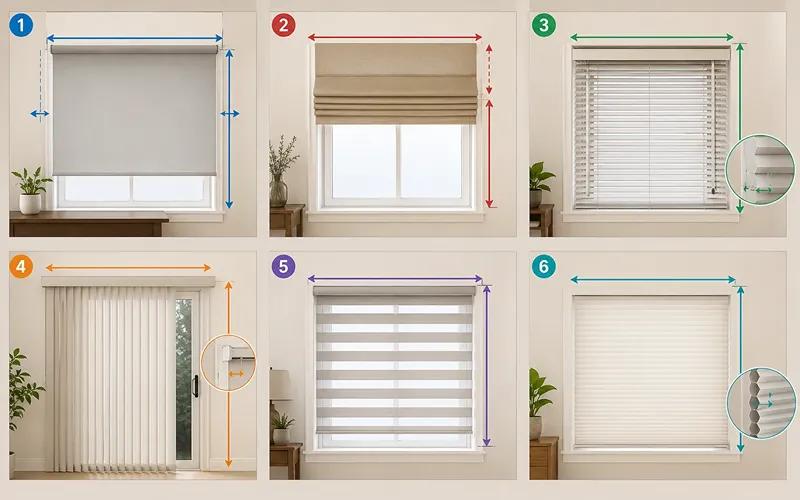
The steps above apply to most window treatments, but a few blind types have their own small adjustments worth knowing before you order.
Roller blinds are measured the same way as standard blinds, though outside mount roller blinds often need extra width on each side to fully block light at the edges.
Roman blinds are usually ordered as outside mount, since the folded fabric needs room to stack above the window when raised. Leave extra height above the frame for this stack space.
Venetian blinds follow the standard width and height process, but depth matters more here, since the slats need enough frame clearance to tilt and rotate without hitting the sill or trim.
Vertical blinds are typically used on sliding doors and large windows, so width is usually the more critical measurement. Track length should match the full opening, with a small allowance if the blind will stack to one side.
Zebra blinds (also called dual shades) are measured like roller blinds, but because the fabric has alternating sheer and solid bands, height should be checked carefully so the pattern lines up evenly when the shade is raised or lowered.
Cellular blinds, sometimes called honeycomb shades, are lightweight and often used for a tight inside mount fit. Since the honeycomb cells add a bit of thickness, confirm the frame depth can accommodate the headrail without rubbing against window hardware.
In every case, the core method stays the same: measure width, height, and depth carefully, then check the manufacturer’s guidance for that specific blind type before finalizing your order.
Final Thoughts
Measuring for blinds is a straightforward process when approached carefully. Taking three readings instead of one, recording width and height in the correct order, and leaving deductions to the manufacturer are the key habits that lead to an accurate fit. Following these eight steps will help ensure your blinds are installed correctly the first time.
For windows with an unusual shape, such as bay or arched windows, professional measuring services offered by many retailers can be a practical alternative to measuring on your own.
Frequently Asked Questions
How accurate do blind measurements need to be?
Aim for the nearest 1/8 inch. Blinds are made to precise dimensions, so even a small error in width or height can lead to gaps or a blind that does not sit flush against the frame.
Do I measure the frame or the glass?
Always measure the frame or window recess, not the glass. The visible glass pane is smaller than the full opening, and measuring it will result in a blind that is too small once installed.
Should I round measurements up or down?
If a reading falls between two 1/8-inch marks, round down slightly for inside mount so the blind is not too wide to fit inside the frame, and round up for outside mount so the blind fully covers the opening. This is separate from the manufacturer’s own clearance deduction, which you should not adjust yourself, as noted in Step 7.
What if my window is not square?
This is common, especially in older homes. Take three width and three height readings as described in Steps 3 and 4, then use the smallest width and the longest height so the blind covers the window even where the frame is uneven.
Can I measure blinds without removing old blinds?
Yes, in most cases. You can measure around existing blinds as long as you can reach the corners of the frame with a tape measure. If the old blinds block your view of the frame edges, it is worth taking them down temporarily for an accurate reading.
What if the top, middle, and bottom widths differ?
This is normal and expected. For inside mount, use the smallest of the three width readings so the blind is not too wide to fit. For height, use the longest of the three readings so the blind fully covers the window.
Do I need to measure every window in a room, even if they look identical?
Yes. Windows that appear the same size often have small differences, especially in older homes. Measuring each one individually and labeling your notes clearly prevents mix-ups when placing your order.
How long does measuring a window usually take?
For a single window, the full process, including gathering tools, measuring width, height, and depth, and checking for obstructions, typically takes about five to ten minutes once you are familiar with the steps.