
New blinds can change the look of a room in an afternoon. The good news is that you don’t need a professional to do it. If you can use a tape measure and a drill, you can learn how to hang blinds yourself and get a neat, straight result on the first try.
This guide walks you through the whole job: measuring, choosing your mount type, gathering tools, fitting the brackets, installing the blinds, and avoiding the mistakes that trip up most first-timers.
Before You Start: Inside Mount or Outside Mount?
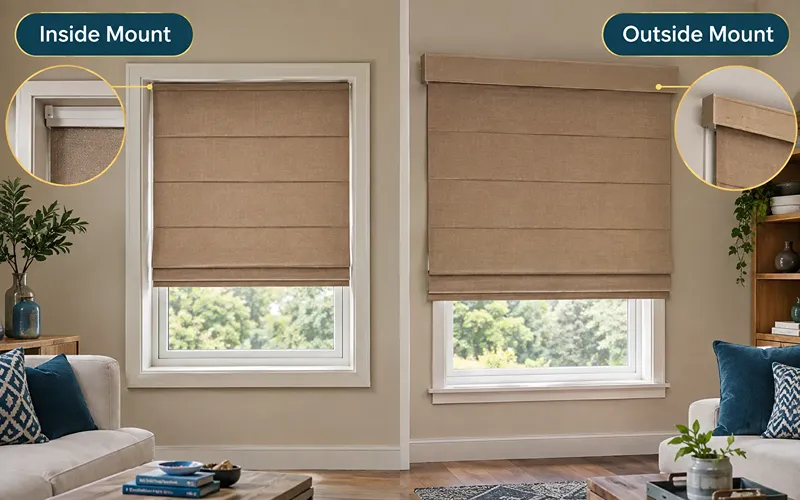
Your first decision is where the roman or roller blinds will sit. This choice affects how you measure, so make it before you pick up the tape measure.
Inside Mount
An inside mount places the blind inside the window frame. It gives a clean, built-in look and shows off any decorative trim around the window.
Choose inside mount if your window frame is deep enough to hold the headrail (the top bar of the blind). Most blinds list a minimum depth on the packaging. If your frame is too shallow, the blind will stick out or won’t fit at all.
Outside Mount
An outside mount places the blind on the wall or trim above the window, covering the whole frame.
Choose outside mount if your frame is too shallow, if the window isn’t square, if you want to block more light, or if you want the window to look bigger. Outside mounts are also more forgiving if your measurements are a little off.
How to Measure Windows for Blinds
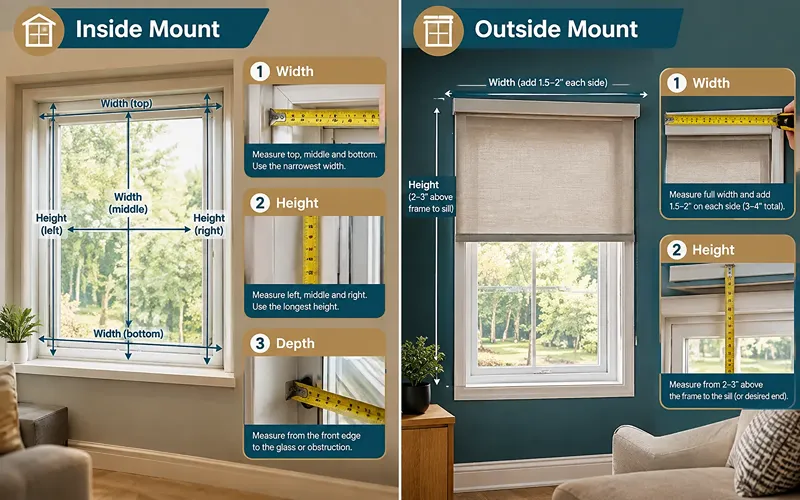
Accurate measuring is the most important part of learning how to hang blackout blinds. A blind that is even a quarter inch off can scrape, jam, or leave gaps. Use a steel tape measure, not a fabric one, and measure to the nearest 1/8 inch.
Measuring for an Inside Mount
- Width: Measure the inside of the frame at the top, middle, and bottom. Write down the narrowest of the three. Windows are rarely perfectly square, and using the smallest number stops the blind from binding.
- Height: Measure the inside of the frame on the left, middle, and right. Write down the longest of the three so the blind covers the full window.
- Depth: Measure from the front edge of the frame back to the glass or any obstruction, like a window crank or lock. Compare it with the minimum depth the blind needs.
Don’t subtract anything yourself. When you order an inside-mount blind using your exact measurement, the maker usually trims a small amount so the blind fits without rubbing.
Measuring for an Outside Mount
- Width: Measure the full width of the area you want to cover, then add about 1.5 to 2 inches on each side (3 to 4 inches total). This reduces light gaps and improves privacy.
- Height: Measure from where the top of the headrail will sit (usually 2 to 3 inches above the frame) down to the sill, or to where you want the blind to end.
Always write measurements as width × height so there’s no mix-up when you order.
Tools You’ll Need
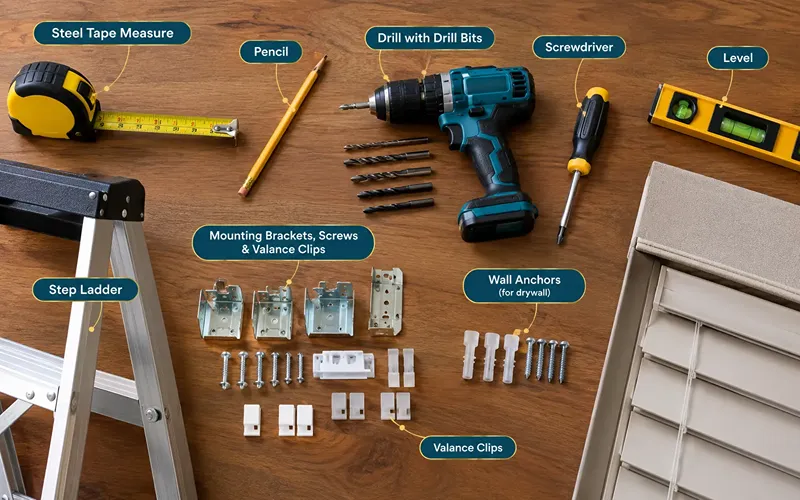
Get everything ready before you start. It saves time and stops you from stopping halfway through.
- Steel tape measure
- Pencil
- Drill with drill bits (a bit slightly smaller than your screws)
- Screwdriver or screwdriver bit
- Level (a small one fits inside window frames more easily)
- Step ladder
- The mounting brackets, screws, and valance clips that came with your blinds
- Wall anchors, if you’re mounting into drywall for an outside mount
How to Hang Blinds: Step-by-Step Installation
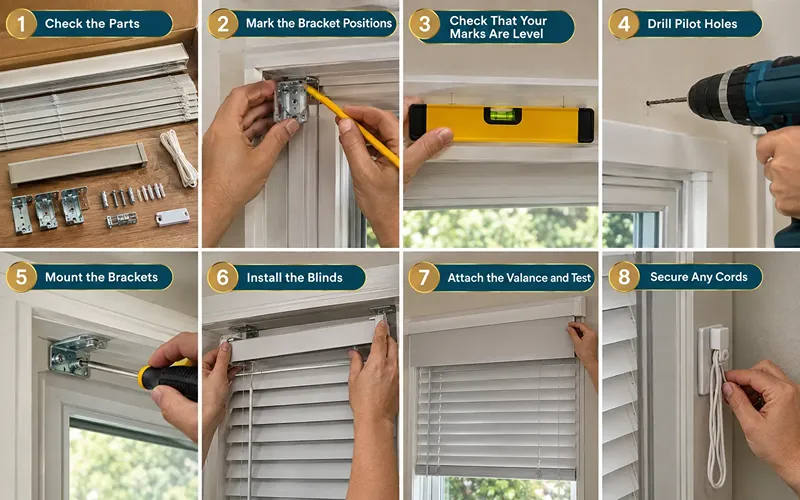
Step 1: Check the Parts
Open the box and lay everything out. Check that you have the brackets, screws, valance, and any center support bracket. Blinds wider than about 48 inches usually need a center support to keep the headrail from sagging.
Step 2: Mark the Bracket Positions
Hold a bracket in place and mark its screw holes with a pencil.
- Inside mount: Place the brackets inside the top of the frame, a couple of inches in from each side. Push them far enough back that the headrail and valance will sit flush with the front of the frame.
- Outside mount: Place the brackets on the wall or trim just beyond each end of where the headrail will go.
Follow the placement guidance in your blind’s instructions, since spacing can vary by brand and style.
Step 3: Check That Your Marks Are Level
Lay your level across the marks or hold it against the brackets. This step is quick but critical. If your brackets aren’t level, your blinds won’t hang straight or work smoothly.
Step 4: Drill Pilot Holes
Drill small pilot holes at each pencil mark. Pilot holes stop the wood from splitting and make the screws easier to drive. If you’re mounting into drywall with no stud behind it, install wall anchors first.
Step 5: Mount the Brackets
Screw each bracket firmly into place. Make sure they are all facing the same direction and lined up evenly. If you have a center bracket, install it in the middle.
Step 6: Install the Blinds
Most blinds attach in one of two ways:
- Box brackets (common on wood and faux-wood blinds): Open the hinged cover on each bracket, slide the headrail in, and snap the covers shut.
- Clip-in brackets (common on cellular and roller shades): Hook the front edge of the headrail into the brackets, then push the back up until it clicks.
Gently tug on the blind to make sure it’s secure.
Step 7: Attach the Valance and Test
Clip the valance onto the front of the headrail to hide the hardware. Then raise and lower the blind a few times and tilt the slats if it has them. It should move smoothly and stay put where you leave it.
Step 8: Secure Any Cords
If your blinds have cords, install the included cord cleat or tension device so loose loops stay out of reach. This is especially important in homes with young children or pets. Cordless blinds avoid this issue entirely.
Common Mistakes to Avoid When Hanging Blinds
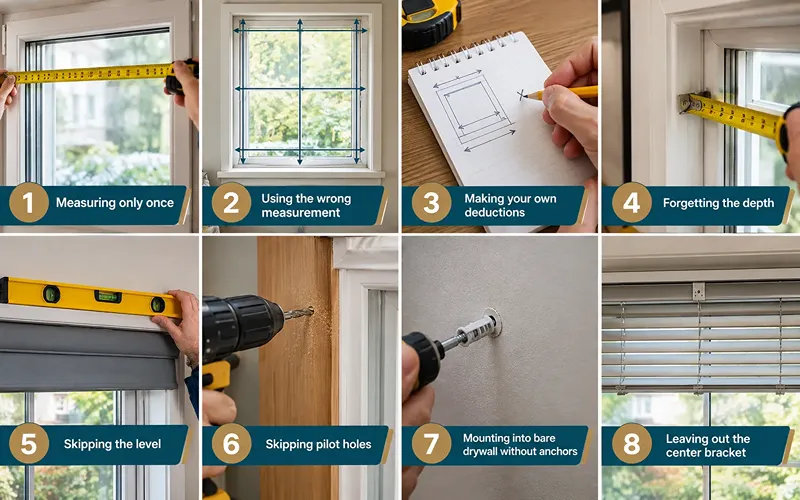
Even simple projects can go wrong. Here are the most common mistakes and how to avoid them.
Measuring only once. Windows aren’t perfectly square. Always measure in three places and double-check before ordering.
Using the wrong measurement. For inside mounts, use the narrowest width and the longest height. Using the wrong one leads to blinds that scrape or leave gaps.
Making your own deductions. Don’t subtract width from an inside-mount measurement. The manufacturer usually does it for you, and doing it twice leaves a visible gap.
Forgetting the depth. A frame that’s too shallow can make an inside-mount blind stick out or block the window handle.
Skipping the level. Eyeballing bracket positions almost always leads to a crooked blind.
Skipping pilot holes. Driving screws straight into wood can split the frame and weaken the hold.
Mounting into bare drywall without anchors. Screws alone won’t hold in drywall. Use anchors or find a stud.
Leaving out the center bracket. Wide or heavy blinds need extra support, or the headrail will bow over time.
Final Thoughts
Now you know how to hang blinds from start to finish. The key is careful measuring, choosing the right mount, and taking a moment to level your brackets before you drill. Get those three things right, and the rest of the job is simple. With a little patience, you’ll have neat, professional-looking blinds in every room.
Frequently Asked Questions
How long does it take to hang blinds?
Most people can hang blinds in 15 to 30 minutes per window once everything is measured and the tools are ready. Your first window may take longer.
Can I hang blinds without drilling?
Yes. Tension rods and adhesive brackets work for lightweight blinds and shades, which makes them a good option for renters. They aren’t suitable for heavy wood or faux-wood blinds.
Is inside or outside mount better?
Neither is better overall. Inside mount looks cleaner and more built-in. Outside mount blocks more light, hides uneven frames, and works on shallow windows.
Do I need a center bracket?
Usually yes if your blinds are wider than about 48 inches. Check your product instructions to be sure.